In a recent blog article, we announced our new Learning Management System (LMS). With this new tool, Brand Wings users can now:
- Quickly and easily create interactive and engaging courses for sales staff covering topics such as product features, sales techniques, customer service, and more. You can use various formats, such as videos, content, and assets to make learning fun and effective.
- Automate onboarding and certification for new hires and existing employees. You can assign learning paths and monitor progress with real-time reports. You can also ensure compliance with industry standards and regulations by tracking successful completion of courses.
- Restrict specific access to Brand Wing's wide array of sales tools until specific learning objectives have been met.
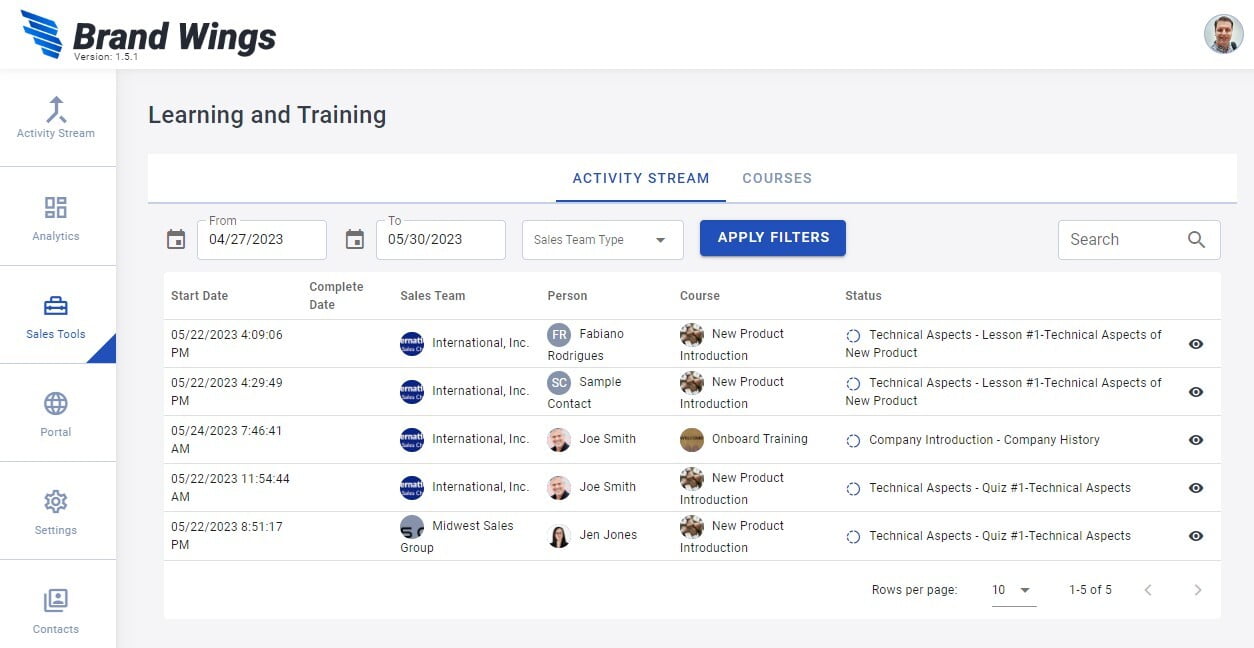
- Activity Stream: Like the Activity Stream throughout Brand Wings, this is an easy way to see which sales users are taking or have completed a course More on this later.
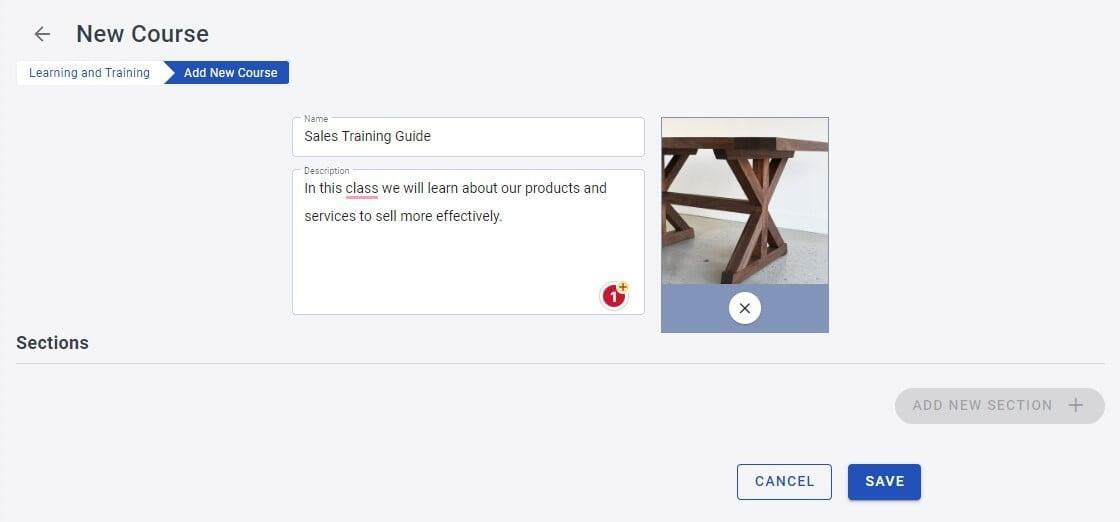
- Courses: This is where you can create, edit, and assign courses. This is where we will start.
- Asset Review: Select an Asset that you have already uploaded for the sales user to review. This could be a PDF, Video, Word file, Image, etc. You can specify that amount of time the sales user must spend viewing the asset before continuing. If the Asset is a Video, you can require that the sales user watch the entire video.
- Content Page Review: Select a Content Page that you have already defined for the sales user to review. Like an Asset, you may indicate a minimum amount of time the sales user must spend reviewing the content.
- Quiz: Create interactive multiple choice quizzes to assess the sale user's learning.
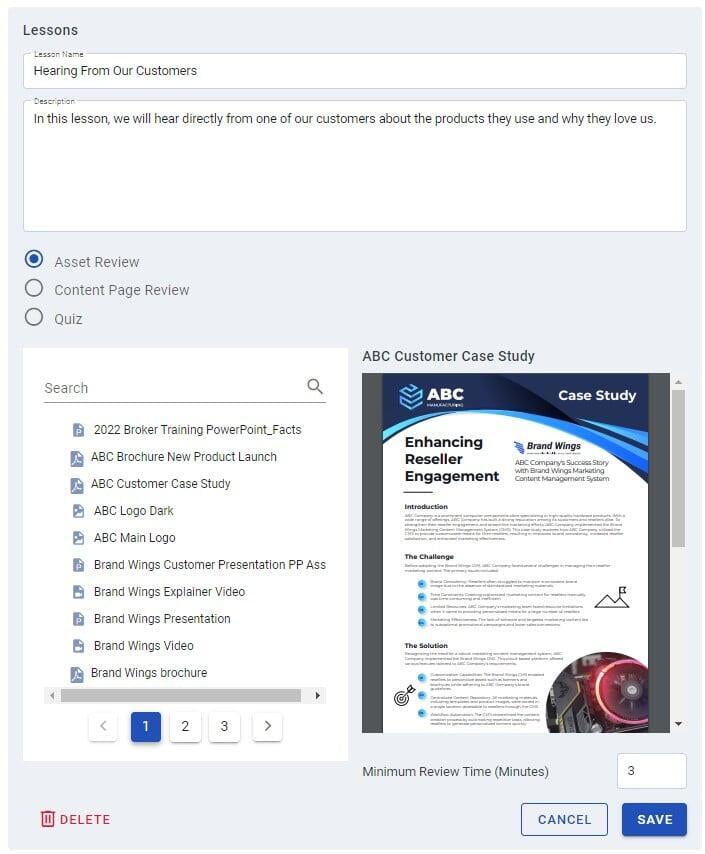
You can enter a name and description for the lesson. Next, select an Asset you want the sales user to review. Enter the minimum review time, in minutes, and click Save.
Now let's create a brief quiz to test their knowledge. Click Add Lesson. After entering a Name and Description, choose the Quiz option:
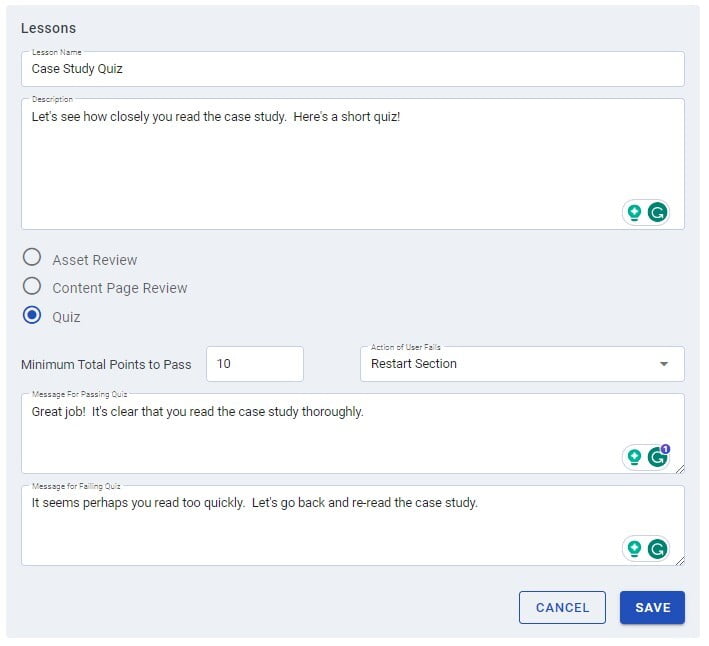
When you select the Quiz option, a few more options appear:
- Minimum Total Points to Pass: As you create multiple choice questions in the quiz, you can assign points for correct answers. This is the total number of points that must be earned to pass.
- Action if User Fails: Select an option to indicate what should happen if not enough points were earned. In this example, the user will need to restart the Section, which means re-reading the Asset we already assigned as the first Lesson.
- Message for Passing Quiz: If the user passes, this text will be displayed before proceeding to the next Lesson
- Message for Failing Quiz: If the user does not receive enough points, display this text before taking the Action if User Fails step you just selected.
Click Save when finished with these settings. Now click Add Question to start building out the Quiz.
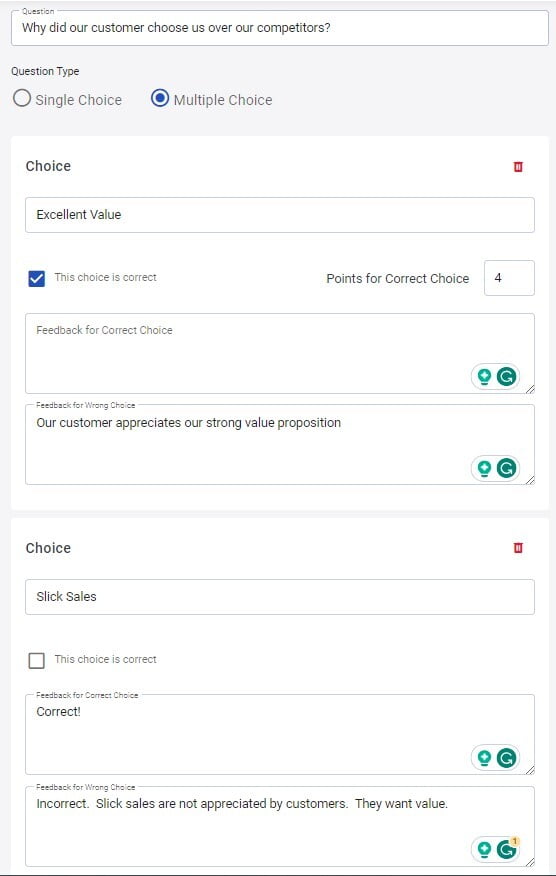
Create as many choices as you wish. Note that you can assign point values for a correct choice, and there can be more than one correct choice per question. You can also provide feedback to the sales user for a correct or incorrect answer. Be sure to click Save when finished.
You can continue to add Sections and Lessons as needed. As you navigate through the Course creation area, you'll notice the same set of icons when you are looking at a list of Sections, Lessons, or Quiz questions:
- Trash Can: Click this to delete the item
- Eye: Click to edit the item
- Arrows: Click and drag to reorganize.
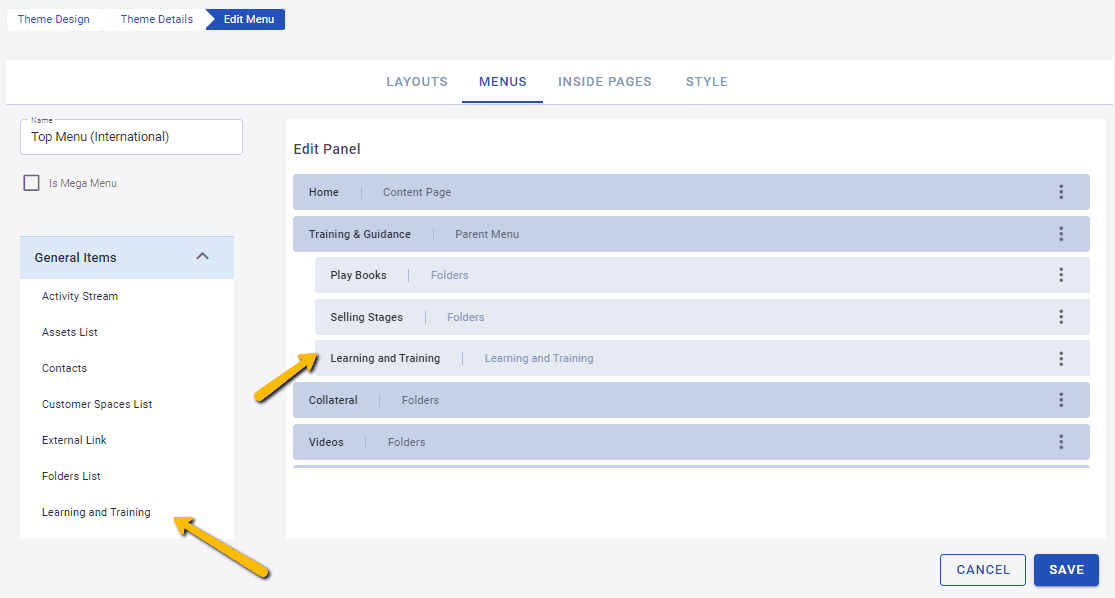
Now that you have created a Course, we have a few more settings to make. First go to Portal --> Theme Design --> (Select Theme) --> Menu Tab. You may want to add Learning and Training to a navigation menu by clicking and dragging "Learning and Training" from the General Items area into your navigation structure:
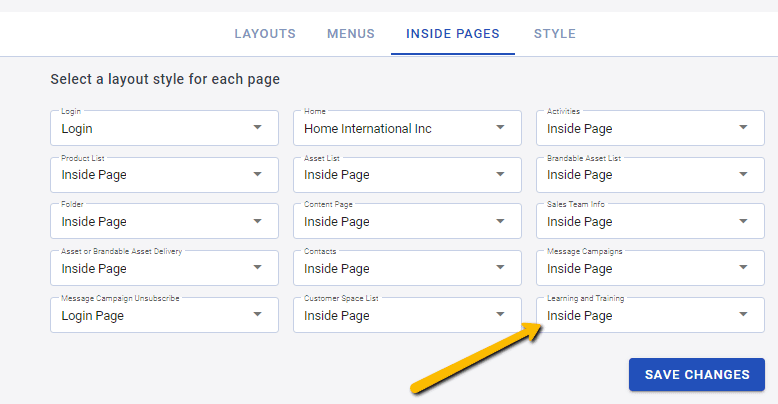
Next, click on the Inside Pages tab and making sure Learning and Training has a Page Layout selected:
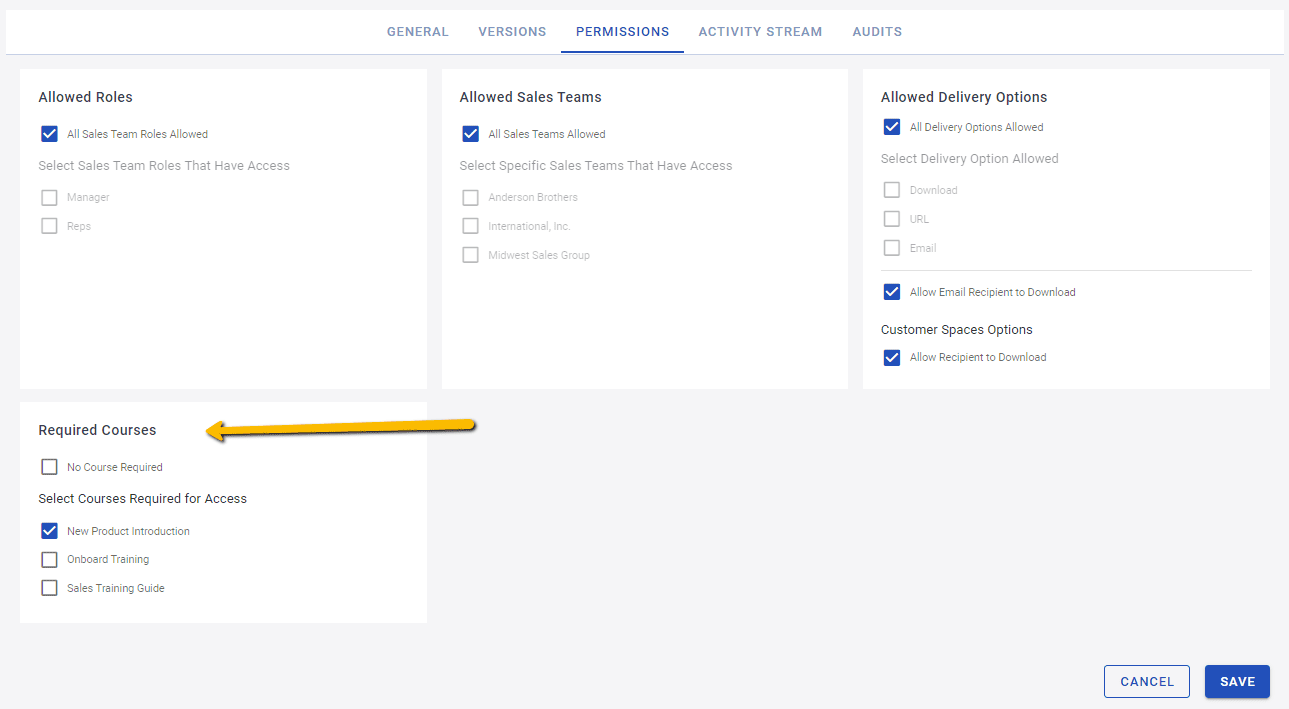
A very powerful feature is to limit access to various sales tools, such as Assets, to only those users that have successfully completed a Course. Go to Sales Tools-->Assets and select an Asset. Then click on the Permissions tab. In the Required Courses section, uncheck the "No Courses Required" option and then check which Course(s) must be completed for the sales user to have access:
Be sure to click Save when finished. Now, let's invite some sales user to it. Navigate back to the list of Courses, and click the Send icon next to the Course:
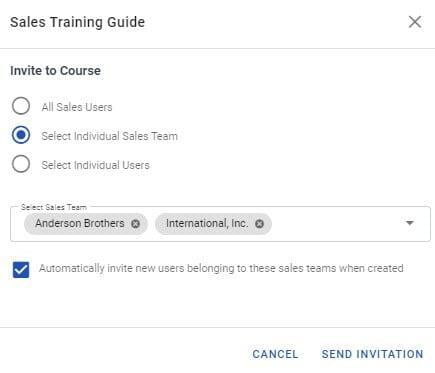
When inviting sales users to the Course, there are three different ways to select the recipients of this invitation:
- All Sales Users
- Select Individual Sales Teams: As the name suggests, you may select one or more sales teams to the Course
- Select Individual Users: Only send the Course to one or more individuals
If you select the first two options, you can also check the box to automatically have new sales users you create be invited to the Course.
When finished, click the Send Invitation button.
When a Sales User logs into their Portal, they will be greeted with this notification:
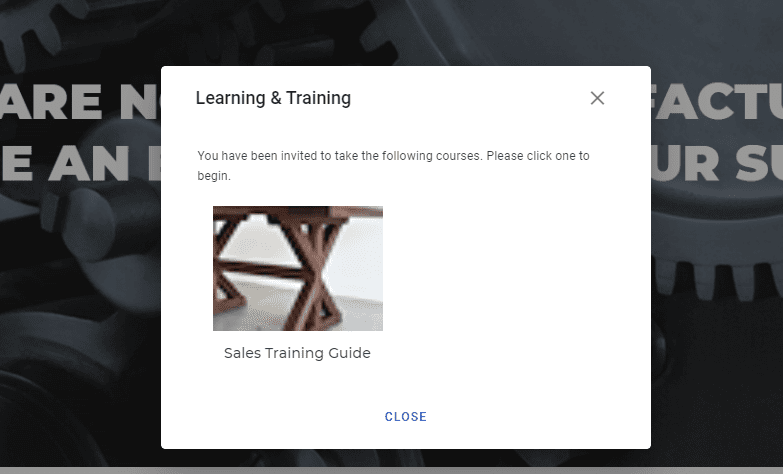
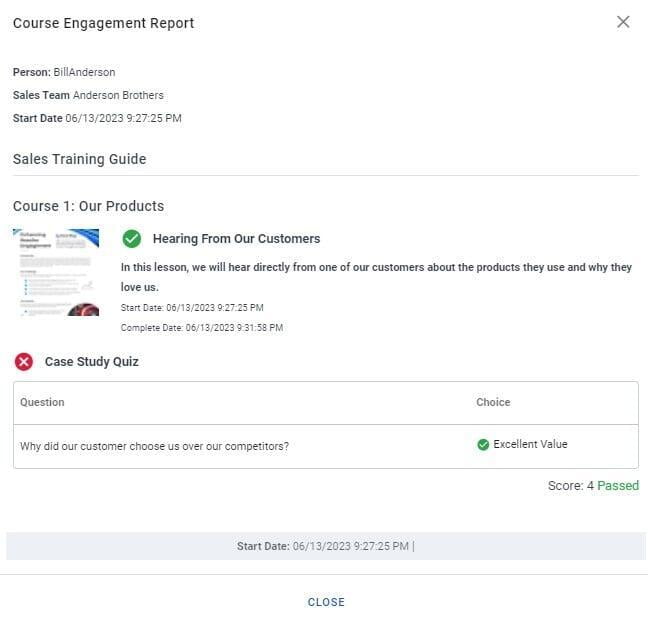
The Sales User can complete the Course you have created. Later, if you want to see the users's progress, you can find it in the Activity Stream. Click the eye icon next to the item on the Activity Stream to view the engagement report:
You have now learned the basics for our new Learning Management System. As always, please contact us if we can be of any assistance. Happy learning!